Tools
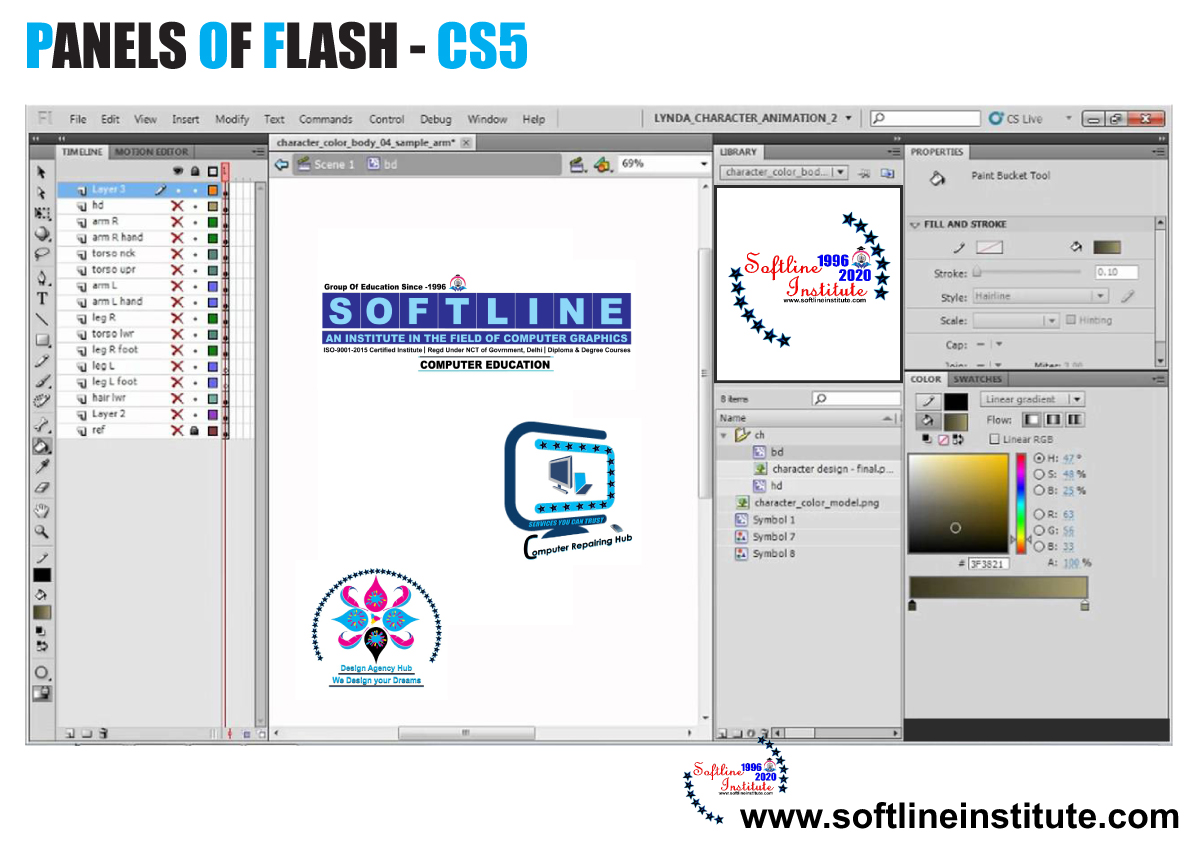
The tools panel is located on the right side of the Flash CS5 window. The tools in this panel appear in the form of buttons and are used to draw, paint, select, and modify a Flash graphics, as well as change the view of the Stage. The Tools panel can be collapsed or expanded according to your convenience by using the double arrows located at the top of the panel.
Some tools in the Tools panel appear in groups. These groups can be seen in fly-out menus, where one tool in the group is available by default. For instance, the fly out menu under Rectangle Tool contains Oval Tool, Rectangle Primitive Tool, Oval Primitive Tool, and Polystar Tool.
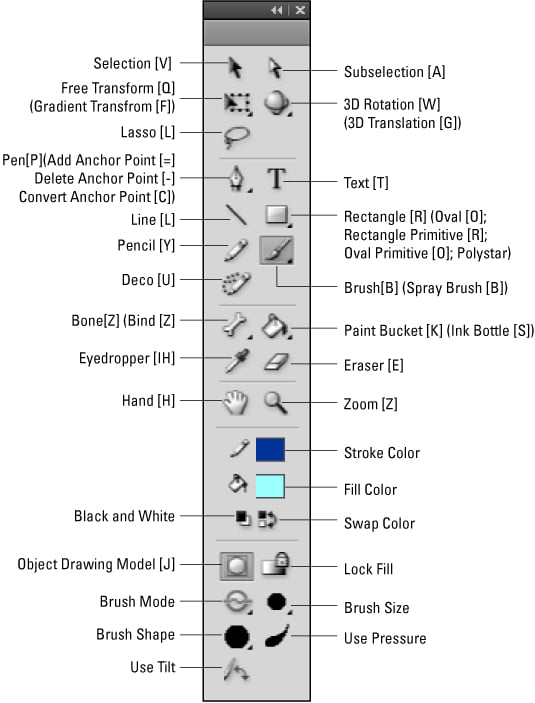
All Tools of Flash CS5
| S.no. | Tool | Description |
|---|---|---|
| 1 | Selection Tool | Selects, moves, deforms, or splits objects and shapes in the Document Window. |
| 2 | Subselection Tool | Selects and transforms the outlines of a shape. |
| 3 | Free Transform Tool | Scales and rotates objects. |
| 4 | Gradient Transform Tool | Scales and rotates the gradients applied to objects and shapes |
| 5 | 3D Rotation Tool | Rotates a Movie Clip Symbol in the X, Y and Z axes. |
| 6 | 3D Translation Tool | Moves a Movie Clip Symbol in the X, Y and Z axes. |
| 7 | Lasso Tool | Selects objects and shapes. |
| 8 | Pen Tool | Draws precise paths, such as straight lines and smooth curves. |
| 9 | Text Tool | Provides a text field to add text. |
| 10 | Line Tool | Draw straight lines. |
| 11 | Rectangle Tool | Draws rectangle and squares. |
| 12 | Oval Tool | Draws circular and elliptical shapes. |
| 13 | Rectangle Primitive Tool | Creates rectangles and squares with corners that can be reshaped. |
| 14 | Oval Primitive Tool | Creates basic oval. |
| 15 | Polystrar Tool | Creates star-shaped objects and polygons other than a quadrilateral. |
| 16 | Pencil Tool | Draws freeform lines and shapes. |
| 17 | Brush Tool | Draws thick, artistic lines, such as the strokes of a brush on a canvas. |
| 18 | Spray Tool | Creates spray-painting effects in a graphic. |
| 19 | Deco Tool | Creates a pattern, such as a grid or vine fill, to an object or scene. |
| 20 | Bone Tool | Allows jointed movement within a single object or between two or more objects. |
| 21 | Bind Tool | Modifies the links between individual bones and control points of a shape. |
| 22 | Paint Bucket Tool | Adds and changes the fill color of shapes created on the stage. |
| 24 | Eyedropper Tool | Selects fill and stroke attributes from objects. |
| 25 | Eraser Tool | Removes unwanted shapes and objects from the Stage. |
| 26 | Hand Tool | Drags and scrolls the Stage horizontally and vertically. |
The PROPERTIES Panel
The PROPERTIES Panel is located at the right side of the stage, beside the tools panel. This panel provides easy access to the properties or attributes of the items or objects selected on the stage or in the TIMELINE panel. For example, if you select some text, the PROPERTIES panel displays the properties such as style color, and size of the text.
If no object is selected, the PROPERTIES panel displays the attributes of the Stage and the currently opened or active Flash Document. The PROPERTIES panel not provides important details of a selected object but also allows you to change the settings of various elements in your animation. When you select two or more objects on the Stage, the PROPERTIES panel displays the position of the objects with respect to X and Y coordinates as well as the area convered by the objects.
The PROPERTIES panel is displays in the Flash window by default. However, if you do not see this panel, you can select Window –> Properties, to view the panel. Following figure shows the Properties panel of FLASH CS5.
![1. Getting Around Flash - Flash CS6: The Missing Manual [Book]](https://www.oreilly.com/library/view/flash-cs6-the/9781449330453/httpatomoreillycomsourceoreillyimages1237914.png)
The Library Panel
The LIBRARY panel is located at the right direction of the PROPERTIES panel. This panel is used to store and organize the content of your Flash project, such as symbols, bitmaps, graphics, sound files, and video clips. These items are organized into folders and sorted by name, type, or date in the LIBRARY panel. You can use this panel to easily access the elements of your project and change specific settings. The LIBRARY panel is displayed in the ESSENTIALS workspace by default. However, in case you do not see the panel in the UI, simply select window –> LIBRARY to view the panel.
The TIMELINE Panel
Flash documents are made up of layers, frames, and graphical objects such as symbols, which are displayed on the Stage. These elements are controlled from the TIMELINE panel. Located below the Stage, the TIMELINE panel helps you to organize and control the content of your Flash document through layers and divide the length of time of the animation into frames. The speed of an animation is determined by the frames played by Flash in a second and is measured in frames per second (fps). A faster rate allows for a smoother animation. The default frame rate in Flash rate in Flash in 24fps.
The TIMELINE panel consists of the following four components: Layers, Frames, playhead, and TIMELINE status. Layers are similar to filmstrips stacked one on top of the other, each containing a different image or set of images that appear on the stage. The layers present in an active Flash document are displayed in a column at the left of the TIMELINE panel. A new Flash document contains a single layer named Layer 1 by default.
An animation or movie in Flash consists of a series of individual images. Each image is called a Frame.
A Frame displays the content of your animation or movie at any point of time. They can consists of text, audio, video, code, and image. The advantage of using Frames in your Flash animation is that you have to specify only the starting and ending frames of the animation and Flash provides the remainder of the frames that lie between these two frames automatically.
Keyframes, on the other hand, are frames that represent the point in an animation or movie where movement takes place. The header at the top of the TIMELINE panel indicates the Frame numbers.
The playhead, locates in the TIMELINE panel, is a red rectangle with a red line extending down the grid. It indicates the current Frame displayed on the Stage. When an animation is played, the Playhead moves from the left to right in the TIMELINE panel.
The Timeline status, displayed at the bottom of the TIMELINE panel, indicates the selected Frame number, the current Frame rate, and the elapsed time in the current Frame.
The MOTION EDITOR panel
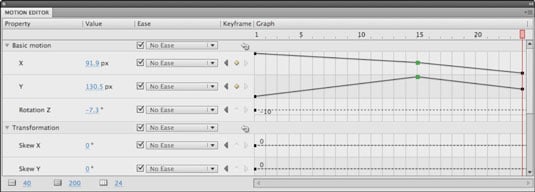
The MOTION EDITOR panel allows you to edit the motion of objects in your animation. This panel is used to edit only motion tweens, and can be used to control basic motion such as rotation, transformation, color effects, filters, and easing.
NOTE
A motion tweens is a way of creating automated animations in Flash. You can use a motion tweens to more or rotate a Flash object on the Stage over a selected period of time, without having to define the position of the object for every Frame of the animation. Easing refers to the speed at which a motion tween executes a motion.
The MOTION EDITOR panel is divided into several columns. The Property column displays the list of properties associated with a motion, and the Value column displays the value of each property. You can change these values by dragging the sliders left or right according to your requirement. The Ease column allows you to select the type of ease you want to apply to the motion. You can enable an ease type by selecting the appropriate check box beside the drop-down list located in the ease column.
In the Keyframes column you can click the left and right arrows to move to the previous and next frames, respectively, while the diamond between two arrows allows you to add or remove Keyframes based on the position of the playhead in the graph area. The graph column displays the easing or motion path for each of the properties. A dashed line signifies that there are no Keyframes set for that specific property, and a solid line signifies there are Keyframes.
The Curve represent a change in property over time from the first Frame to the last Frame.
For More Information